Introduction
EQOMP (EQ + Compressor) is a professional dynamic equalizer that introduces a fundamentally new approach to frequency-selective dynamics processing. Unlike traditional multiband compressors or dynamic EQs, EQOMP uses the EQ's frequency response curve as the compression threshold itself.
The Core Innovation
In EQOMP, the threshold is not a horizontal line — it's a curve that follows the exact shape of your EQ band's frequency response. This creates musical, transparent dynamics processing that respects the natural harmonic structure of your audio.
Precision Targeting
Apply dynamics processing with surgical precision using parametric EQ-style frequency selection.
Continuous Response
No crossover artifacts or phase issues — the frequency response is completely continuous.
Musical Results
Preserves harmonic relationships and natural tone while controlling dynamics.
Real-time Visual
See exactly what's happening with real-time gain reduction visualization per band.
First Steps
- Create your first band — Click an empty area on the graph or click the EQ curve line to add a band.
- Enable Dynamic EQ — Double-click the EQ point, press D, or use the footer/popup toggle.
- Adjust threshold — Drag the threshold point vertically, or use Option+↑/↓ for ±5 dB steps.
- Adjust ratio — Cmd+vertical drag on the threshold point (Win: Ctrl+drag).
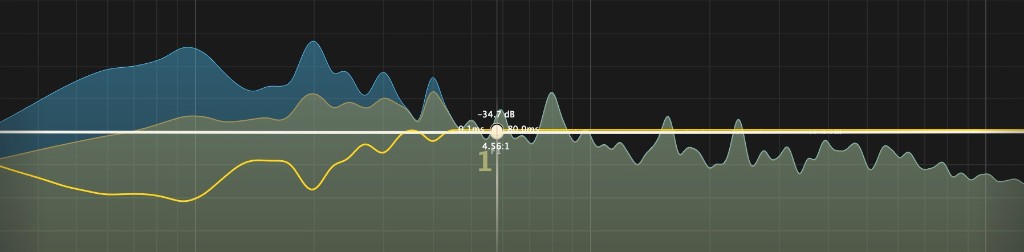
- Monitor gain reduction — Watch per-band GR meters on the graph and open ENVELOPE for live detector/threshold display.
Quick Examples
Vocal De-Esser
Parametric band at 5–8 kHz, Q 2–4, threshold −20 to −30 dB, ratio 4:1–8:1, fast attack.
Bass Resonance Control
Narrow parametric at 80–200 Hz, Q 4–8, threshold −15 to −25 dB — tames resonance only when it builds.
Mix Bus Glue
Load Compressor-Single Band, set Utility 1ST. COMP to Single Band, adjust Band 1 threshold for full-range glue.
Understanding the Display
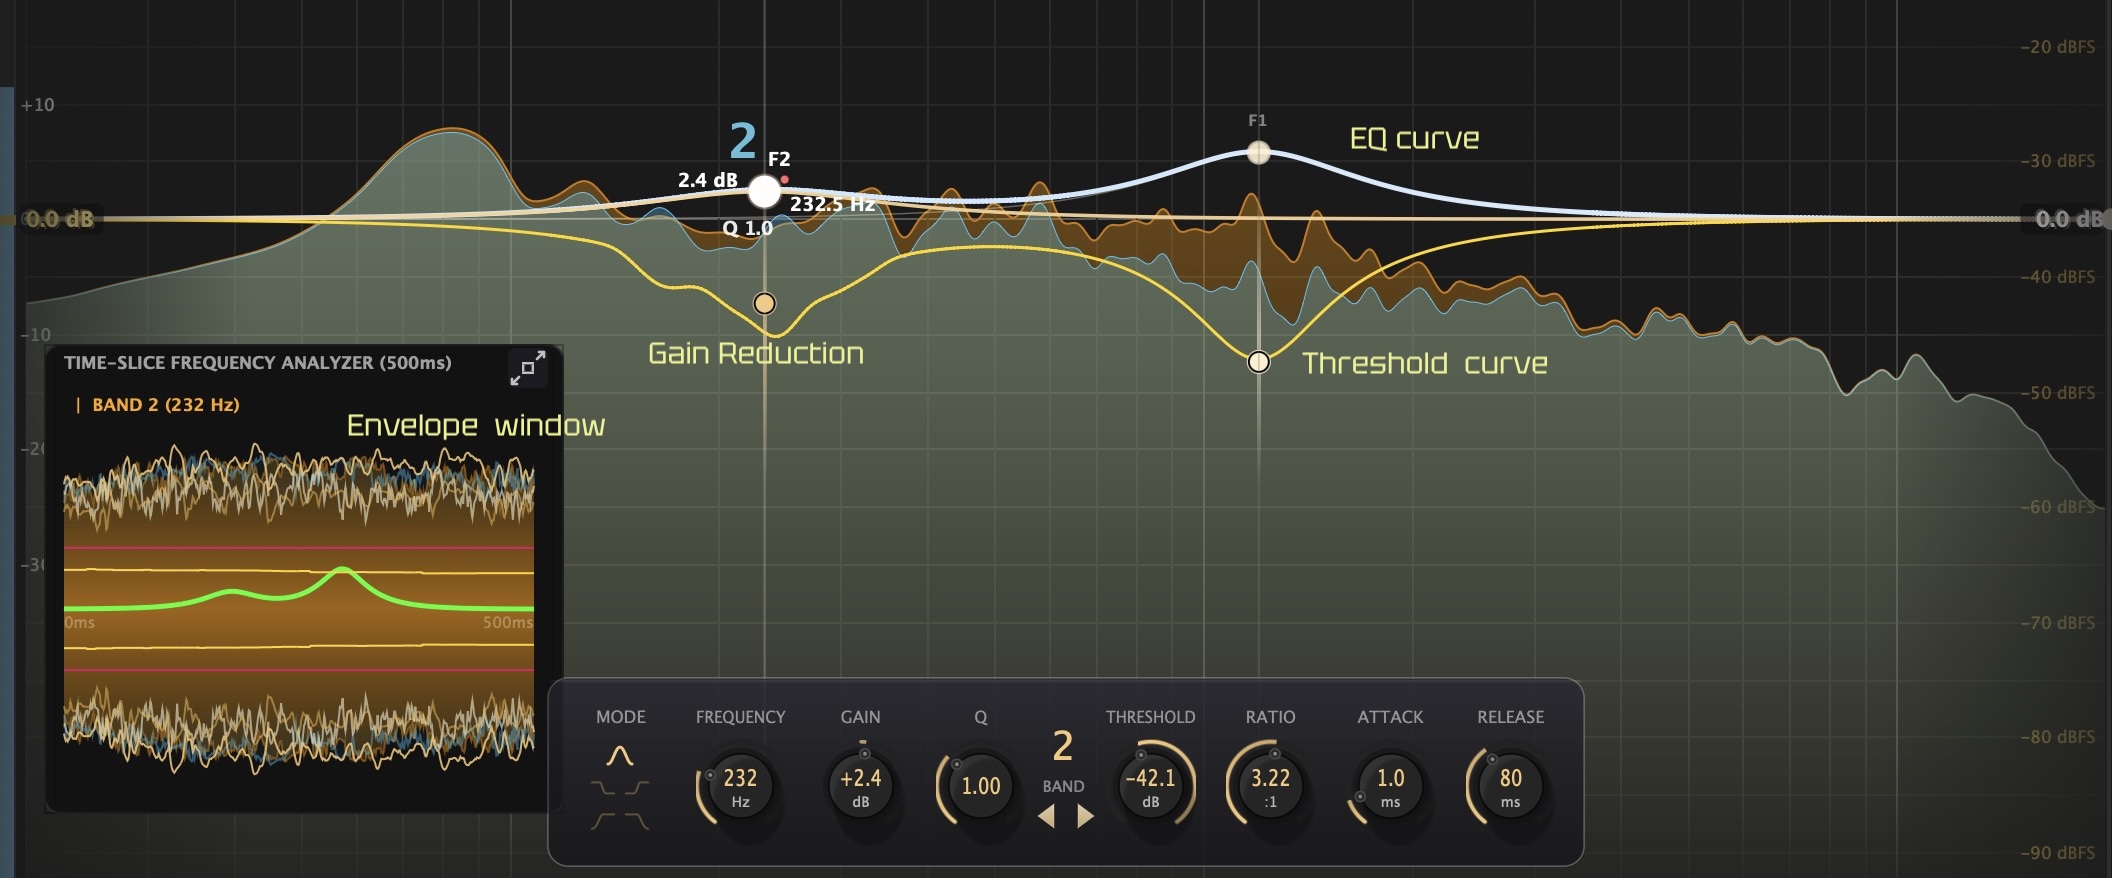 Screenshot file:
 Manual/images/fig-02-graph-layers.png
| Element | What It Shows |
|---|---|
| EQ Curve | Static frequency response shape for each active band |
| Threshold Curve | Blended dynamic map — where and how much reduction begins |
| Gain Reduction | Per-band GR meters and envelope popup reduction trace |
| Envelope Monitor | Live waveform, detector, threshold, and GR in the ENVELOPE window |
Keyboard & Mouse Shortcuts
Mac modifiers: Option = ⌥, Cmd = ⌘ (graph drags), Ctrl = ⌃ (keyboard shortcuts use Control+Shift, not Command+Shift). Windows: Alt = Option, Ctrl = Command for graph drags. Click the graph first to enable keyboard shortcuts.
Graph — Mouse (EQ Point)
See Band Controls for the full interaction table. Key clicks verified from source:
| Action | Keys / Mouse |
|---|---|
| Solo | Option+Click |
| Band Bypass | Option+Shift+Click |
| Band Enable toggle | Option+Ctrl+Click |
| Compressor Bypass | Cmd+Shift+Click |
| Remove band | Option+Cmd+Shift+Click |
| Dynamic EQ | Double-Click EQ point |
Keyboard (selected band, graph focused)
| Action | Shortcut | Notes |
|---|---|---|
| Toggle Dynamic EQ | D | |
| Toggle Solo | Ctrl+Shift+S | Mac: Control+Shift+S |
| Toggle Band Bypass | Ctrl+Shift+M | Mac: Control+Shift+M |
| Toggle Band Enable | Ctrl+Shift+B | |
| Compressor Bypass | Ctrl+Shift+C | |
| Delete band | Delete / Backspace | Mac: also Cmd+Delete (Logic) |
| ±5 dB gain/threshold | Option+↑/↓ | Depends on selected point |
| ±1 dB fine adjust | Option+Shift+↑/↓ | |
| Threshold → 0 dBFS | Option+Ctrl+Shift+↑ | Threshold point selected |
| Invert EQ gain | Option+Ctrl+Shift+↑/↓ | EQ point selected |
Mouse Wheel
| Action | Shortcut |
|---|---|
| EQ gain scale (30→12→6→3 dB) | Ctrl+Wheel on graph |
| Spectrum Y-axis zoom | Cmd+Wheel or Option+Wheel |
| EQ gain scale (left ruler) | Wheel on left ruler |
| Spectrum zoom (right ruler) | Wheel on right ruler |
| Reset scale to default | Double-Click left or right ruler |
| IN/OUT gain ±0.5 dB | Wheel on meter |
| Adjust Q | Wheel on band point |
Global & Other
| Action | Shortcut |
|---|---|
| Undo | UNDO header button (no Cmd+Z) |
| Redo | REDO header button |
| Reset knob to default | Option+Click on knob |
| Type value directly | Double-Click on knob |
| Envelope freeze | F |
Product Overview
EQOMP is a 10-band parametric EQ with integrated threshold-curve dynamics, output clipper, sidechain panel, envelope monitor, and global Utility controls. It runs as AU, VST3, AAX, and Standalone on macOS and Windows.
Main Features
- Threshold-curve dynamic EQ — compression follows your EQ shape
- Single Band broadband compression mode (1ST. COMP)
- Real-time envelope and gain-reduction monitoring
- 11 factory presets, user .bls presets, A/B compare
- Configurable FFT buffer, spectrum display, and Precision View zoom
System requirements and installation: see Specifications and License & Support.
UI Overview
Main Window Layout
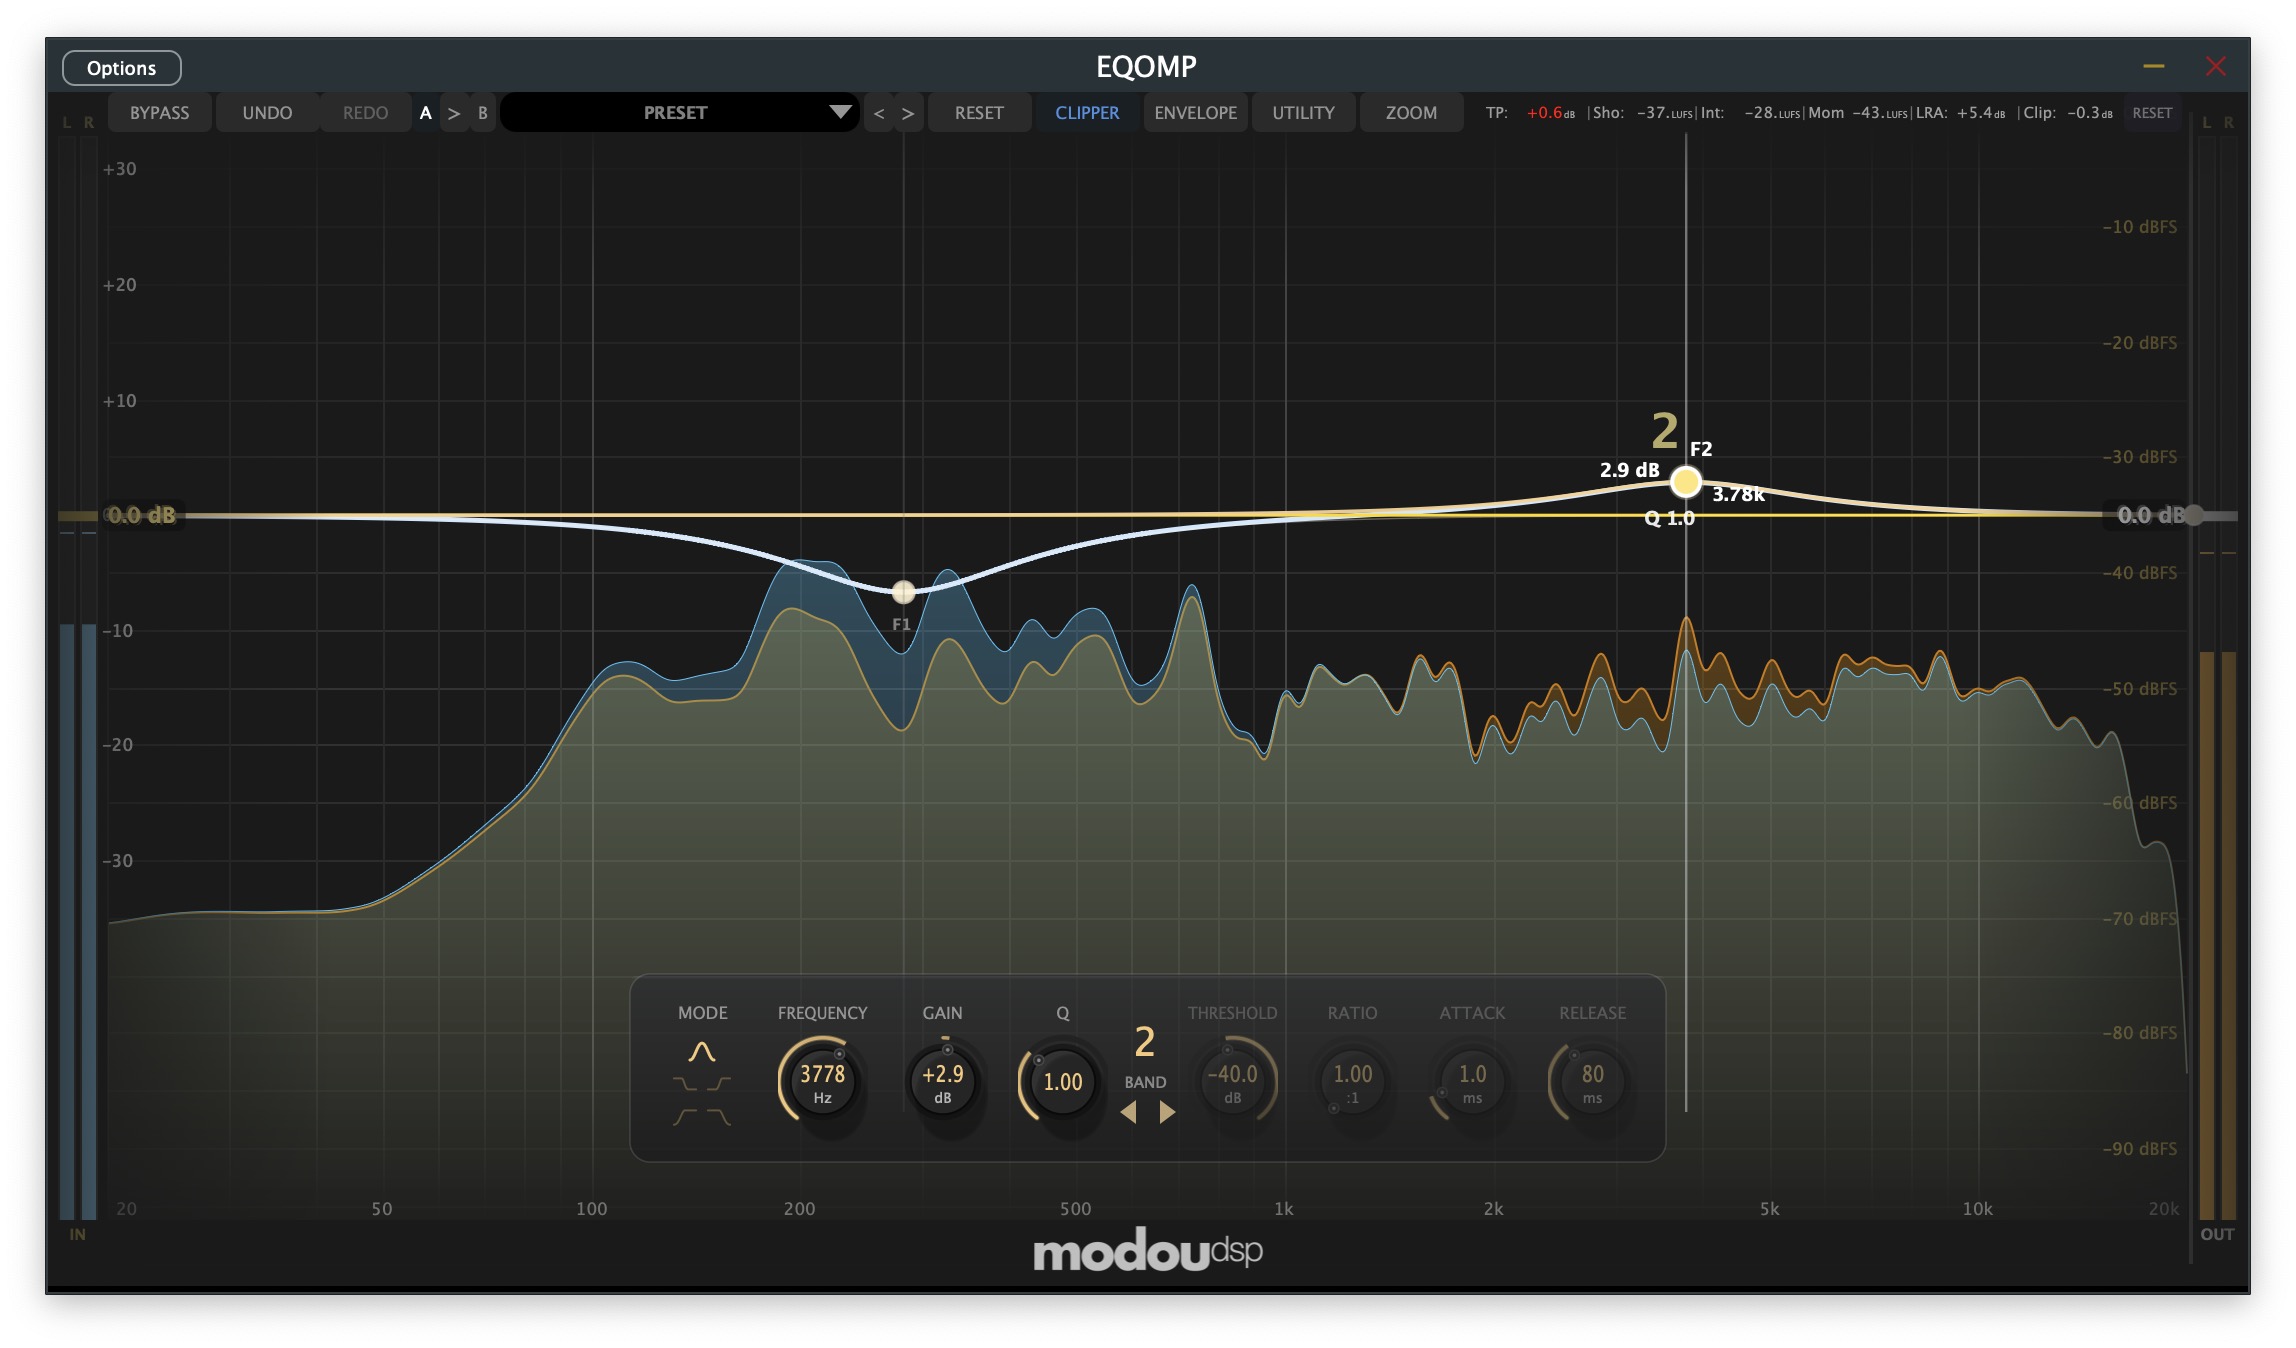 Screenshot file:
 Manual/images/fig-01-main-window.png
Top Section
The header combines preset recall, undo and A/B comparison, and direct access to the plugin-wide buttons you need most while shaping the graph.
Preset & Reset Controls
- Preset Menu — Shows the current preset and opens load, save, rename, delete, and refresh actions
- Preset Arrows — Step through the available preset list one slot at a time
- RESET Button — Clears all bands, returns I/O gain to default, resets transient history, and restores a neutral editing state
Undo & A/B Controls
- A Button — Recalls or targets comparison slot A for instant before/after checking
- Arrow Button (>) — Copies the active state across the A/B slots
- B Button — Recalls or targets comparison slot B
- UNDO Button — Restores the previous edit state after graph, popup, or preset actions
- Undo History — Preset changes and graph edits feed the same history so comparisons stay fast
- A/B State Scope — Each slot stores the full plugin state, not just the selected band
 Screenshot file:
 Manual/images/fig-03-header-bar.png
Header Control Buttons
Left header: BYPASS, UNDO, REDO, A/B compare (A, copy arrow, B), preset name, and preset navigation arrows.
Right header: RESET, CLIPPER, ENVELOPE, UTILITY, ZOOM, and SIDECHAIN. (FOCUS knob and BASIC button are reserved placeholders in the current build.)
- BYPASS Button — Switches the main signal path between processed and bypass behavior
- CLIPPER Button — Toggles the output clipper directly from the main header
- ENVELOPE Button — Opens the envelope popup for detector, threshold, and reduction monitoring
- UTILITY Button — Opens the Utility panel for theme, BYPASS MODE, BAND 1 COMP, buffer size, spectrum, and language
- SIDECHAIN Button — Opens the sidechain and monitoring panel
Reset & Session Notes
Session Reset: RESET is a working-state reset, not a cosmetic refresh. It restores the graph, dynamics, gain staging, and capture history to a neutral baseline.
- RESET also restores: Input/output gain to 0 dB and Dynamic EQ off across all bands
- RESET affects:
- Band enable states, filter types, frequencies, and gains
- Threshold, ratio, attack, release, and compressor bypass settings
- Graph history, transient capture buffers, and waveform overlays
- Selected-band focus so the editor returns to a clean starting point
- Use Case: Use RESET when you want a clean graph quickly without closing the instance or reloading the plugin.
- Workflow: Preset recall is for saved sounds; RESET is for returning the current session to an editable baseline.
Loudness & Status
- Header Metering — Loudness and metering readouts stay available so you can judge IN/OUT gain, bypass differences, and overall level behavior while editing
Center Section — Waveform Display
- Combined response graph — Shows static EQ, threshold curve, and reduction overlays in one editing view
- EQ and threshold points — Drag the main points for tone, then the threshold points for dynamic sensitivity
- Per-band reduction meters — Real-time traces show how much each active dynamic band is reducing
- Analyzer and waveform views — Input/output display, level overlays, and envelope-linked visuals stay synchronized
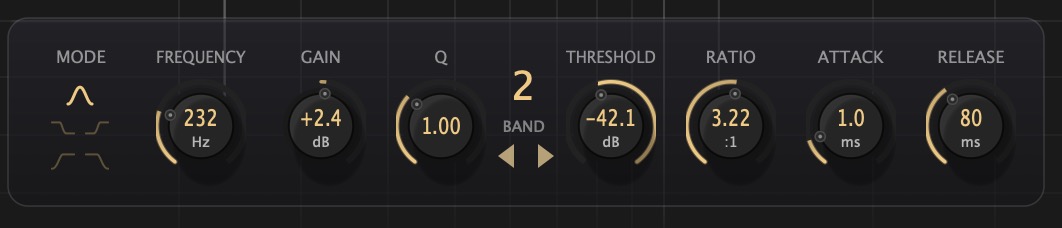 Screenshot file:
 Manual/images/fig-09-footer-controls.png
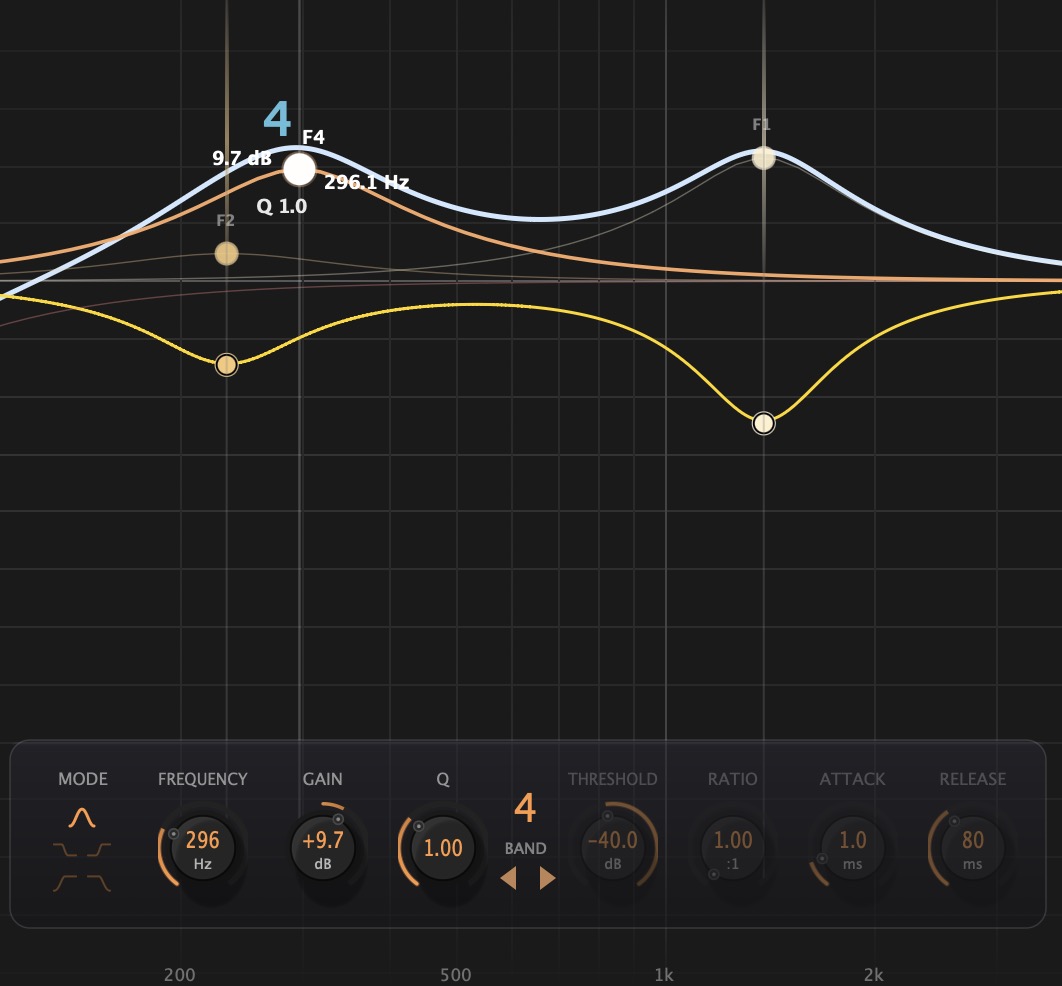
Bottom Section — Parameter Controls
- Band Buttons — Select and enable/disable bands (10 bands available)
- Mode — Filter type (Parametric, Shelf, Filter)
- Frequency — Center/corner frequency
- Gain — Static EQ gain (±30 dB)
- Q — Bandwidth/resonance
- Threshold — Dynamics sensitivity (0 to -75 dBFS, default -35 dBFS for new dynamic bands)
- Ratio — Gain reduction amount (1:1 to 20:1)
- Attack — Response speed (0.1 to 1000 ms)
- Release — Recovery speed (1 to 2000 ms)
- Input/Output — Global gain controls
Utility Panel
Concept: The Utility Panel collects global settings that appear in the panel itself: support buttons, theme, bypass mode, Band 1 comp, language, analyzer display, buffer size, spectrum tilt, wave smooth, version info, and license status.
Location: Open the UTILITY button in the header.
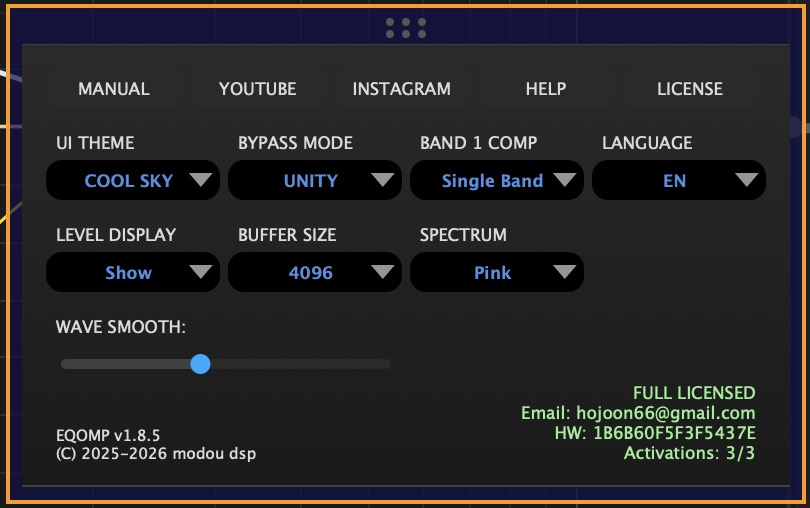 Screenshot file:
 Manual/images/fig-07-utility-panel.png
Row 2: UI THEME, BYPASS MODE, BAND 1 COMP, LANGUAGE — four equal-width columns.
Row 3: LEVEL DISPLAY, BUFFER SIZE (256–4096), SPECTRUM (White/Pink).
Row 4: WAVE SMOOTH slider (full width).
Top Buttons
- MANUAL
- YOUTUBE
- HELP
- LICENSE
UI Theme
Concept: The visual theme controls the color scheme and appearance of the entire plugin interface, allowing you to customize the look to match your workflow preferences.
Options: 10 themes: OceanBlue, SunsetOrange, ForestGreen, DesertTeal, PastelMint, NeonPurple, WarmCoral, CoolSky, BlackAndWhite, MidnightGreen
- OceanBlue: Balanced blue theme for general use
- SunsetOrange: Warm orange theme for creative sessions
- ForestGreen: Cool green theme for long mixing sessions
- DesertTeal: Teal theme for bright environments
- PastelMint: Soft mint theme for detailed work
- NeonPurple: Vibrant purple theme for electronic music
- WarmCoral: Coral theme for acoustic recordings
- CoolSky: Sky blue theme for mastering
- BlackAndWhite: High contrast theme for accessibility
- MidnightGreen: Dark green theme for low-light studios
Bypass Mode (UNITY / GAIN)
Bypass affects only the signal path — whether the output is passed through (bypassed) or processed. It has no effect on GUI or DSP operation; meters and displays continue to work.
- UNITY — Signal is bypassed: output = input (no input/output gain, no EQ). Default.
- GAIN — When BYPASS is on, input gain and output gain are still applied (EQ processing is skipped).
Select UNITY when you want to hear the dry signal; select GAIN when you want input/output gain staging while bypassed. This control is labeled BYPASS MODE in row 2 of the Utility panel.
BAND 1 COMP
Function: Sets how Band 1 enters dynamic processing when Dynamic EQ is first enabled. Two options: Single Band and Q Value. See Single Band Mode for the full workflow.
Single Band
When Band 1 Dynamic EQ is enabled for the first time, Q is set to 0.001 — the widest practical setting.
Q Value
When Band 1 Dynamic EQ is enabled for the first time, Q is set to 1.0.
Band 1 only: BAND 1 COMP applies when Dynamic EQ is first activated on Band 1. Changing the Utility setting does not retroactively change Q on bands that already have Dynamic EQ enabled.
Language
Concept: EQOMP provides six interface languages and matching manual text so the current workflow can be followed in the same layout.
- English (EN): Default language, complete documentation
- 한국어 (KR): Full Korean translation
- 日本語 (JP): Complete Japanese localization
- Español (ES): Spanish translation
- Français (FR): French translation
- 中文 (CN): Chinese translation
LEVEL DISPLAY
Level Display: Show or hide loudness and peak overlays in the main graph from Utility (LEVEL DISPLAY, row 3).
- Show — Loudness and peak overlays appear on the main graph
- Hide — Overlays are hidden for a cleaner graph view
BUFFER SIZE
Buffer Size Controls: Choose the analyzer buffer manually. Smaller values refresh faster; larger values resolve frequency detail more clearly.
- 256: Fastest analyzer refresh with the least frequency detail
- 512-1024: Practical starting range for most editing and mixing work
- 2048: Finer analyzer detail for corrective work and resonance checks
- 4096: Highest analyzer resolution with the slowest visual refresh
SPECTRUM
Spectrum (SPECTRUM): Choose White or Pink tilt for the analyzer display in Utility (row 3, third column).
- White — Flat spectrum display tilt
- Pink — Pink-noise compensated spectrum tilt
WAVE SMOOTH
Visual Smoothing: Controls waveform and envelope redraw speed. Higher settings feel steadier; lower settings react faster.
- 0-20%: Real-time monitoring and fast response
- 30-60%: General mixing work
- 70-100%: Detailed signal analysis
Footer
Footer: Plugin version and copyright (bottom left); license status, email, hardware ID, and activation count (bottom right).
- Activated: Full functionality available
- Trial: Days remaining shown
- Expired: Limited functionality
License View
LICENSE view: Selecting LICENSE replaces the control grid with license registration and management.
- TRIAL — Request a trial license from the server
- ACTIVATE — Activate with license key and email
- PURCHASE — Open purchase page
- MANAGEMENT — Open license management
Note: Close the LICENSE view to return to the normal Utility control grid.
Band Controls
Band Selection
Select bands by clicking EQ or threshold points on the graph. Use the band navigation arrows or footer controls for the active band. Up to 10 bands; inactive slots are hidden until added.
- Enabled/Disabled — Click the band button to toggle
- Selected — Click to select for parameter editing
- Bypassed — Option+Shift+Click toggles band bypass
Band Point Interaction
| Action | Keys / Mouse | Notes |
|---|---|---|
| Select band point | Click | Opens control popup; starts drag |
| Move frequency & gain | Drag | EQ point, no modifiers |
| Adjust Q | Cmd+↔ Drag | Win: Ctrl+↔ Drag on EQ point |
| Toggle Dynamic EQ | Double-Click | EQ point |
| Toggle Solo | Option+Click | Clears bypass; Win: Alt+Click |
| Toggle Band Bypass | Option+Shift+Click | Clears solo |
| Toggle Band Enable | Option+Ctrl+Click | Mac: Option+Control — not Command |
| Compressor Bypass | Cmd+Shift+Click | Or Option+Ctrl+Shift+Click |
| Reset / remove band | Option+Cmd+Shift+Click | Calls removeBand |
| Toggle Solo (alternate) | Triple-Click | Within 300 ms on band point |
| Band context menu | Right-Click | EQ point — Delete, Compressor, Bypass, Solo, Filter Type |
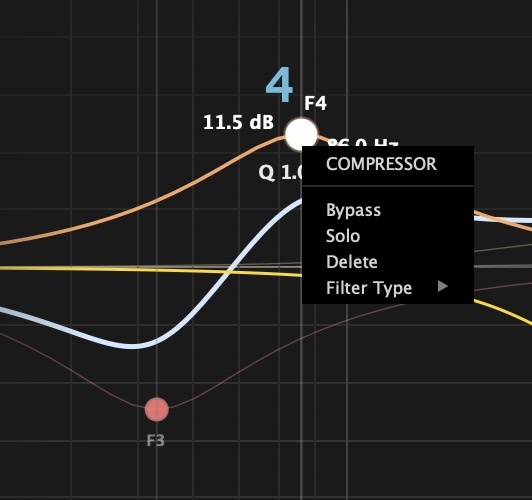
 Screenshot file:
 Manual/images/fig-04-band-interaction.png
Threshold Point Interaction
| Action | Keys / Mouse | Notes |
|---|---|---|
| Select threshold point | Click | Opens dynamics popup |
| Adjust threshold | Drag ↕ | Vertical drag |
| Adjust frequency | Drag ↔ | Horizontal drag without Command |
| Adjust ratio | Cmd+↕ Drag | Win: Ctrl+↕ Drag |
| Adjust attack / release | Cmd+↔ Drag | First drag direction locks A or R |
| Adjust Q / bandwidth | Option+Shift+Drag | ↕ bandwidth, ↔ bell width |
| Reset dynamics defaults | Double-Click | Threshold point |
Band Colors
Each band has a unique color for easy identification. The colors are consistent across:
- Band buttons
- EQ curve segments
- Gain reduction meters
- Parameter displays
EQ Parameters
- Parametric — Bell/Peak filter with adjustable Q
- Shelf-Hi — High shelf filter
- Shelf-Lo — Low shelf filter
- Filter-Hi — High-pass filter
- Filter-Lo — Low-pass filter
- Low Q (0.1-0.5) — Wide, gentle curves
- Medium Q (0.5-2) — Musical, versatile
- High Q (2-30) — Narrow, surgical
Dynamic Parameters
- 1:1 — No reduction (dynamics off)
- 2:1 to 4:1 — Gentle, transparent control
- 4:1 to 8:1 — Moderate compression feel
- 8:1+ — Strong limiting behavior
- Fast (0.1-5 ms) — Catches transients, may reduce punch
- Medium (5-20 ms) — Balanced, preserves some attack
- Slow (20-1000 ms) — Lets transients through, smooth response
- Fast (1-50 ms) — Quick recovery, may pump
- Medium (50-200 ms) — Natural, musical
- Slow (200-2000 ms) — Smooth, sustained reduction
Dynamics Enable
Each band's dynamics processing can be independently enabled/disabled. When disabled, the band functions as a static EQ only. Enable dynamics to activate the threshold-curve processing.
Filter Modes
Parametric (Bell/Peak)
The default and most versatile mode. Creates a bell-shaped curve centered at the frequency with width determined by Q.
- Dynamics behavior: Gain reduction follows the Q curve exactly
- Best for: Surgical frequency control, resonance taming, tone shaping
Shelf-Hi (High Shelf)
Boosts or cuts all frequencies above the corner frequency.
- Dynamics behavior: Processing applies to all frequencies above the corner
- Best for: Air/brightness control, high-frequency taming
Shelf-Lo (Low Shelf)
Boosts or cuts all frequencies below the corner frequency.
- Dynamics behavior: Processing applies to all frequencies below the corner
- Best for: Bass control, low-end management, warmth adjustment
Filter-Hi (High-Pass)
Removes frequencies below the cutoff. No gain parameter — only filtering.
- Dynamics behavior: Dynamic high-pass filtering based on input level
- Best for: Dynamic rumble removal, bass cleanup that responds to content
Filter-Lo (Low-Pass)
Removes frequencies above the cutoff. No gain parameter — only filtering.
- Dynamics behavior: Dynamic low-pass filtering based on input level
- Best for: Dynamic harshness control, adaptive brightness limiting
Compressor Control in Filter/Shelf Modes
Important: When a band is changed to Filter or Shelf mode, the compressor is controlled per band, not per bandwidth. Unlike Parametric mode where compression follows the Q curve (bandwidth), Filter and Shelf modes apply compression to the entire frequency range above or below the corner frequency, making the compressor operate on a band-by-band basis rather than following a bandwidth curve.
Single Band Mode (1ST. COMP)
 Screenshot file:
 Manual/images/fig-single-band-mode.png
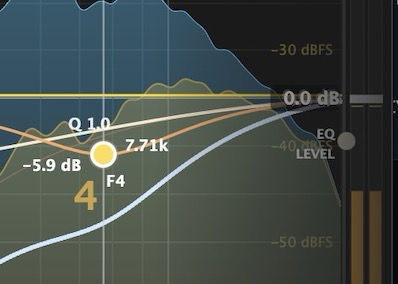
EQOMP's Single Band compressor mode redefines what a dynamic equalizer can do. Instead of splitting the spectrum with crossovers or pinning dynamics to narrow resonances, a single threshold-curve band can govern program dynamics across the full range — while remaining frequency-selective. Utility 1ST. COMP sets how Band 1 enters this workflow when Dynamic EQ is first enabled.
A Paradigm Shift in Dynamic EQ
Traditional multiband compressors divide audio into fixed crossover regions — introducing phase relationships and boundary artifacts. Conventional dynamic EQs often limit processing to narrow bands. Single Band mode breaks this constraint: one dynamic band, shaped by the threshold curve you draw on the graph, can act as a full-spectrum compressor with spectral intelligence. Bus glue, gentle mastering control, transparent program leveling — all from a single band without rebuilding a multiband chain. This is the role EQOMP's next-generation dynamic EQ was built for.
Fluid Response Across Any Q Width
Whether Q is ultra-wide (0.001) or tighter (1.0 and beyond), the algorithm works the same way: gain reduction follows the threshold curve, and only energy that crosses that curve is controlled. A wide Q spreads detector influence smoothly across frequency; a narrower Q concentrates it — but in both cases the response adapts fluidly to whatever signal exceeds the threshold. You are not choosing between compressor and EQ — you are shaping where and how much dynamics react across a continuous spectral field.
Utility Setting
Open UTILITY from the header and find 1ST. COMP in the second row of combo boxes. Two modes are available:
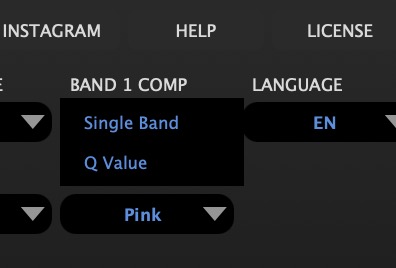 Screenshot file:
 Manual/images/fig-single-band-utility.png
Single Band
When Band 1 Dynamic EQ is enabled for the first time, Q is set to 0.001 — the widest practical setting. This unlocks the full Single Band vision: one threshold curve governing broadband dynamics while the algorithm still responds only where the signal crosses the curve.
Q Value
When Band 1 Dynamic EQ is enabled for the first time, Q is set to 1.0. The same threshold-curve algorithm applies — only the spectral focus narrows, concentrating dynamic response around the band center while still adapting fluidly to threshold crossings.
Band Rules
- Band 1 only: BAND 1 COMP applies when Dynamic EQ is first activated on Band 1. Changing the Utility setting does not retroactively change Q on bands that already have Dynamic EQ enabled.
- Bands 2–10: When Dynamic EQ is first enabled, Q is always set to 1.0, regardless of 1ST. COMP.
- HP/LP filters: High-pass and low-pass bands keep their existing Q (slope) when Dynamic EQ is enabled — Q is not reset for pass filters.
Factory preset: Compressor-Single Band demonstrates Single Band behavior with Band 1 at Q=0.001 and Dynamic EQ active.
Workflow tip: Set 1ST. COMP in Utility before enabling Dynamic EQ on Band 1. For multiband-style work on Bands 2–10, expect Q=1.0 on first activation; adjust Q manually afterward as needed.
Global Controls
 Screenshot file:
 Manual/images/fig-input-output-gain.png
Input/Output Gain
UI theme, bypass mode, band 1 comp, buffer size, spectrum, language, and support buttons are documented in the Utility Panel section.
Bypass
The global BYPASS button operates in the same way as normal mode, but audio passes through unchanged and "BYPASS" text appears in the waveform display. When bypassed:
- Audio passes through unchanged
- "BYPASS" text appears in the waveform display
- All meters continue to show input levels
License Note
Without a valid license, EQOMP operates in bypass mode. In this case, the BYPASS button is disabled to prevent accidental processing. Activate your license to unlock full functionality.
Bypass Mode (UNITY / GAIN)
Bypass affects only the signal path — whether the output is passed through (bypassed) or processed. It has no effect on GUI or DSP operation; meters and displays continue to work.
- UNITY — Signal is bypassed: output = input (no input/output gain, no EQ). Default.
- GAIN — When BYPASS is on, input gain and output gain are still applied (EQ processing is skipped).
Select UNITY when you want to hear the dry signal; select GAIN when you want the full processed signal. The setting is available in the Utility panel (BYPASS MODE).
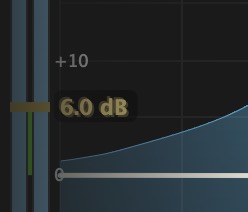
Right Panel Slider
The right panel contains a vertical slider located to the left of the output meters. This slider provides powerful global control over EQ curves and threshold settings with four different modes.
 Screenshot file:
 Manual/images/fig-right-panel-slider.png
Visual Feedback
When dragging either slider, the current mode (LEVEL or TILT) is displayed next to the slider handle. The threshold slider shows both the control type (EQ or THRESHOLD) and the mode (LEVEL or TILT) in two lines. The slider handles return to the center position (0 dB) when released, but the parameter changes remain applied.
Global Settings
These settings apply globally across all plugin instances and are saved between sessions.
Analysis & Display
FFT Buffer (BUFFER): Choose 256, 512, 1024, 2048, or 4096 samples in Utility (row 3, second column). Smaller buffers refresh faster; larger buffers improve low-frequency resolution.
Wave Smooth: Adjusts waveform and envelope redraw smoothness (0–100%). Lower values react faster; higher values feel steadier.
Level Display: Show or hide loudness and peak overlays in the main graph from Utility (LEVEL DISPLAY, row 3).
Spectrum (SPECTRUM): Choose White or Pink tilt for the analyzer display in Utility (row 3, third column).
Precision View Control
Spectrum Y-axis zoom: 6–100 dB range (default 100 dB). Sets the vertical dBFS span for the spectrum, level meters, grid, and EQ curve — all drawn with the same coordinate mapping.
EQ gain scale (left ruler): Snaps through 30, 12, 6, and 3 dB (default 30 dB). Controls how much vertical space the EQ curve uses around the center reference.
Top-anchored display: At 70 dB and above, 0 dBFS stays at the top and the bottom sits at −range dBFS. Below 70 dB, the view zooms symmetrically around −35 dBFS so labels and waveforms stay aligned.
Adaptive grid: Grid and label spacing adjusts with zoom — 1/2 dB steps below 12 dB, 2/5 dB up to 40 dB, and 5/10 dB at 100 dB and above.
Mouse Wheel Control
Command or Option + wheel: Over the graph, adjust spectrum Y-axis zoom in 5 dB steps. The EQ curve, spectrum, meters, and grid update together.
- Scroll up: Wider range (zoom out)
- Scroll down: Narrower range (zoom in)
- On-graph hint: Current zoom value shown at the center while adjusting
Control + wheel: Cycles EQ gain scale through 30 → 12 → 6 → 3 dB over the graph.
Mouse Wheel Parameter Control
Band point + wheel: Scroll over a band point to adjust its Q value.
- Scroll up: Higher Q (narrower)
- Scroll down: Lower Q (wider)
- Range: 0.001 to 10.0
IN/OUT meter + wheel: Left IN meter = input gain, right OUT meter = output gain. Scroll over either meter handle to adjust in 0.5 dB steps (hold Shift for 0.1 dB). Drag works the same on both sides.
Left ruler + wheel: Between the IN meter and left labels — snap EQ gain scale through 30, 12, 6, and 3 dB.
Right ruler + wheel: Between the right dBFS labels and OUT meter — adjust spectrum Y-axis zoom in 2 dB steps.
Double-Click Ruler Reset
Quick reset: Double-click a ruler area to restore its default scale instantly.
- Left ruler: EQ gain scale → 30 dB
- Right ruler: Spectrum Y-axis zoom → 100 dB
- Meter areas excluded: Double-clicking the IN/OUT level bars does not trigger reset
Use 6–12 dB zoom to inspect the noise floor and subtle level changes; use 70–100 dB for a full-session overview. Double-click the right dBFS ruler to return to the 100 dB default.
Graph Band Buttons
Concept: Interactive band buttons on the EQ graph provide direct access to individual band controls and visual feedback for your EQ curve adjustments.
Band Button Features
Visual Controls: Each EQ band has a corresponding button on the frequency response graph.
- Click: Select and highlight the band for parameter adjustment
- Drag: Directly manipulate frequency and gain by dragging the button
- Color Coding: Different colors for different filter types (Peak, Shelf, Cut)
- Active State: Visual indication when band is enabled and processing
Filter Type Indicators
Shape Recognition: Button appearance indicates the current filter type.
- Peak Filter: Circular button for bell-shaped EQ curves
- Shelf Filter: Square button for high/low shelf responses
- Cut Filter: Triangular button for high-pass/low-pass filters
Workflow Integration
Efficient Control: Graph buttons enable fast, visual EQ adjustment workflows.
- Quick Selection: Click any button to instantly access that band's controls
- Visual Feedback: See the exact frequency and gain response in real-time
- Precise Control: Drag buttons for immediate, accurate adjustments
- Curve Overview: See all active bands and their interactions simultaneously
Professional Advantage: Graph band buttons combine the speed of visual control with the precision of numerical input, providing the most efficient EQ workflow available.
Use Cases
De-essing (Vocal Sibilance Control)
Setup
- Mode: Parametric
- Frequency: 5-8 kHz (find the sibilant frequency)
- Q: 2-4 (narrow enough to target sibilance)
- Gain: 0 dB (no static EQ)
- Threshold: -20 to -30 dB
- Ratio: 4:1 to 8:1
- Attack: 0.5-2 ms (fast to catch sibilants)
- Release: 50-100 ms
Why EQOMP excels: The threshold curve means only the sibilant frequencies trigger reduction, and the reduction is proportional to the frequency content — not a blanket cut.
Bass Resonance Taming
Setup
- Mode: Parametric
- Frequency: Find the resonant frequency (often 80-200 Hz)
- Q: 4-8 (narrow to target the resonance)
- Gain: 0 dB
- Threshold: -15 to -25 dB
- Ratio: 3:1 to 6:1
- Attack: 10-30 ms
- Release: 100-200 ms
Why EQOMP excels: Tames only the resonant frequency when it becomes excessive, leaving the rest of the bass intact.
Dynamic Air Enhancement
Setup
- Mode: Shelf-Hi
- Frequency: 8-12 kHz
- Gain: +2 to +4 dB (static boost)
- Threshold: -25 to -35 dB
- Ratio: 2:1 to 3:1 (gentle)
- Attack: 20-50 ms
- Release: 200-400 ms
Result: High frequencies are boosted, but excessive brightness is automatically controlled. You get air without harshness.
Drum Transient Shaping
Setup
- Mode: Parametric
- Frequency: 2-5 kHz (attack frequencies)
- Q: 1-2 (moderate width)
- Gain: 0 dB
- Threshold: -20 to -30 dB
- Ratio: 2:1 to 4:1
- Attack: 30-50 ms (let transients through)
- Release: 50-100 ms
Result: The attack of drums punches through while the sustain/ring is controlled in the target frequency range.
Mastering — Gentle Frequency Balance
Setup
- Multiple bands with very gentle settings
- Q: 0.5-1 (wide, gentle curves)
- Threshold: -30 to -40 dB
- Ratio: 1.5:1 to 2:1 (very gentle)
- Attack: 20-50 ms
- Release: 200-500 ms
Result: Transparent frequency balance that responds to the music. Problem frequencies are gently controlled without obvious processing. For mastering applications, you can use the Single Band or Multiband presets for more effective frequency control. Tip: It's recommended to use single-band compressors that apply different gain reduction for different frequencies, rather than uniform gain reduction across all frequencies.
Frequency-Selective Reduction
Concept
With EQOMP, each band reacts only in its own frequency range. A loud snare won’t pull down the whole bass or piano — only the frequencies that overlap. So you can tame problem peaks without changing the rest of the mix.
Setup
- Mode: Parametric or Multiband
- Use multiple bands for different frequency ranges
- Set thresholds per band independently
- Ratio: 2:1-6:1
- Attack/Release: Adjust per instrument characteristics
Result: Each band is independent. You control only the frequencies that need it; the rest stays natural.
Unwanted Resonance Reduction
Concept
You can reduce the level of unwanted resonances outside of the essential resonances of the audio source by adjusting the attack time. A huge advantage is that you can use a multiband compressor without worrying about phase.
Setup
- Mode: Parametric
- Frequency: Target the unwanted resonance
- Q: 4-10 (precise targeting)
- Threshold: -15 to -30 dB
- Attack: 0.5-5 ms (fast reduction)
- Ratio: 3:1-8:1
Result: Unwanted resonances are quickly reduced while preserving the essential character of the source. The phase-coherent processing ensures transparent results.
Bus Compressor / Master Bus / Glue Compressor Applications
Concept
Use several bands with wide Q and gentle ratios to add glue and cohesion. Each band reacts to its own range, so you can gently control the low end while keeping mids and highs punchy — or the opposite.
Setup
- Start with Single Band or Multiband presets to configure your bands
- Set up multiple bands across the frequency spectrum
- Each band can control up to half the maximum buffer size in frequency range
- Adjust thresholds, ratios, attack, and release per band independently
- Use gentle ratios (1.5:1 to 3:1) for glue compression
- Moderate attack (20-50 ms) and release (100-300 ms) for musical timing
Result: Cohesive bus or master compression with independent control per frequency range, so the mix gels without losing punch or clarity.
Pro Tips
Practical workflow advice for everyday mixing and mastering. For the theory behind transparent dynamics, see Chapter 6 — AM Noise Control.
1. Start with Dynamics Off
Set up your EQ curve first with dynamics disabled. Get the static tone right, then enable dynamics to control problem areas. This gives you a clear reference point.
2. Use the Gain Reduction Meters
Watch the vertical GR lines on each band. If you're seeing constant reduction, your threshold may be too low. Aim for reduction only on problem moments.
3. Q Affects Dynamics Width
Remember: in Parametric mode, Q doesn't just shape the EQ — it defines how wide the dynamics processing applies. A narrow Q means surgical dynamics; a wide Q means broader control.
4. Ratio is Reduction, Not Compression
EQOMP's ratio controls gain reduction, not compression ratio. There's no knee or compression curve. Think of it as "how much to turn down when triggered."
5. Use A/B Comparison
EQOMP's processing is designed to be transparent. Use A/B comparison frequently to ensure you're improving the sound, not just making it different.
6. Match FFT Buffer to the Material
Use 512–1024 for responsive tracking. Switch to 2048–4096 when you need finer low-frequency resolution on the spectrum display. This affects the analyzer only, not latency.
7. Shelf/Filter Modes for Broadband Control
When you need to control entire frequency ranges (all highs, all lows), use Shelf or Filter modes. The dynamics will apply to the entire range, not just a bell-shaped area.
8. Avoiding Artifacts from Aggressive Settings
High ratio, low threshold, and very fast attack together can cause harshness or pumping. Ease off ratio, attack, or threshold until it sounds natural. The goal is processing that improves the sound without calling attention to itself.
9. Understanding Compressor Noise
Excessive compressor processing inevitably introduces noise. This occurs because gain reduction operates as a time-varying control signal that modulates the audio itself. This compressor is designed to minimize such modulation, preserving natural sound even under heavy reduction.
10. AM Noise Control: The Foundation of Professional Dynamic EQ
AM (Amplitude Modulation) noise occurs when the gain envelope changes faster than the audio waveform, causing phase distortion and harsh artifacts. EQOMP prevents this by keeping the gain envelope slow and smooth (sub-audio, below 10Hz), even with fast attack settings. Detection can be fast, but gain application must always be slow and musical.
In summary: EQOMP calculates dynamics based on frequency, but always applies gain as a smooth, time-domain envelope. This prevents AM noise from rapid gain reduction while maintaining natural phase and harmonic relationships.
11. Master Bus / Mastering Presets: Full-Range Control via Band 1
The Compressor-Single Band factory preset demonstrates broadband dynamics on Band 1 (Q=0.001). After loading it, adjust Band 1 threshold to shape overall dynamics from one control. Use Utility 1ST. COMP to choose Single Band or Q Value when first enabling Dynamic EQ on Band 1 — see Single Band Mode for details.
Presets
Factory Presets
EQOMP includes a collection of factory presets designed to demonstrate the plugin's capabilities and provide starting points for common tasks.
Vocal Presets
- Desser
- Vocal
Drum Presets
- HiHat
- Kick-Deep
- OverHeads
- Snare-Ringing out
- Tom-Floor
- Tom-Hi/Mid
Piano Presets
- Grand Piano 5ft
- Concert Grand Piano
Compressor / Bus Presets
- Compressor-Single Band
Saving User Presets
- Set up your desired settings
- Click the preset name in the top bar
- Select "Save Preset..."
- Enter a name and optional category
- Click Save
User presets are saved as .bls files in:
~/Documents/EQOMP/Presets/User/ (macOS)
%USERPROFILE%\Documents\EQOMP\Presets\User\ (Windows)
A/B Compare
Concept: The A/B Compare feature allows you to store and instantly switch between two different EQOMP settings for real-time comparison and fine-tuning.
A/B Buttons
Instant Switching: Two dedicated buttons (A and B) for storing and recalling different plugin states.
- A Button: Store current settings as Preset A
- B Button: Store current settings as Preset B
- Copy Button (->): Copy settings from A to B or B to A
- Undo Button: Revert to previous state
Workflow Applications
Professional Comparison: Essential for critical listening and decision making in mixing and mastering.
- Mixing Decisions: Compare subtle vs. aggressive EQ settings
- Mastering Choices: Evaluate different compression approaches
- Before/After: Instant comparison of your processing
- Fine Tuning: Make small adjustments while comparing results
Technical Implementation
Complete State Capture: A/B slots store the complete plugin state including all band parameters, global settings, and processing modes.
- All Parameters: EQ bands, dynamics, global settings
- Instant Switching: Zero-latency switching between A and B
- Persistent Storage: Settings maintained across sessions
- Independent Operation: Each plugin instance has its own A/B slots
Mixing Essential: A/B Compare is fundamental to professional audio production, enabling confident decision-making through direct, real-time comparison of different processing approaches.
Specifications
| Plugin Formats | VST3, AU, AAX, Standalone |
| Standalone Application | Available with microphone access support for direct audio input processing |
| Supported Platforms | macOS 10.13+, Windows 10+ |
| Supported Architectures | Intel (x64), Apple Silicon (ARM64) - M1, M2, M3, M4 |
| Sample Rates | 44.1 kHz to 192 kHz |
| Bit Depth | 64-bit floating point internal processing |
| Latency | Zero latency (IIR filters) |
| Number of Bands | 10 fully independent bands |
| Filter Types | Parametric, High Shelf, Low Shelf, High Pass, Low Pass |
| Virtual Audio Driver (macOS) | Modou Virtual Audio (2-channel HAL driver, included in the macOS installer) |
| Sidechain | Internal sidechain only (no external input). The processed signal itself is used for detection. |
System Requirements
Minimum
- Intel Core i5 or Apple M1
- 4 GB RAM
- 100 MB disk space
- 1280×720 display
Recommended
- Intel Core i7 or Apple M1 Pro / M2 / M3 / M4
- 8 GB RAM
- SSD storage
- 1920×1080 display
License & Support
License Activation
- Open EQOMP in your DAW
- Click the UTILITY button to open the utility panel
- Click LICENSE to open license management
- Enter your license key and email
- Click Activate
- For a trial key, open LICENSE and use VIP REQ. to request a trial license from the server
License Information
- One license allows activation on up to 3 computers
- Deactivate from one computer to activate on another
- License is tied to your hardware ID (shown in utility panel)
- Signed token licenses are stored locally and re-validated with the server daily
- License file:
~/Library/EQOMP/license.json(macOS) ·%APPDATA%\EQOMP\license.json(Windows) - Activation failed: The license dialog shows "Activation failed" when activation cannot be completed
Trial Version
EQOMP offers a 7-day trial period. During the trial:
- All features are fully functional
- No audio watermarks or interruptions
- Trial countdown shown in utility panel
Support
© 2026 Modou DSP. All rights reserved.
Intellectual Property Protection:
All algorithms, processing methods, and technologies implemented in EQOMP are protected by copyright law, trade secret protections, and intellectual property rights. The Spectral Analysis Engine™, Transient Guard Technology™, Visual Analysis Engine™, and Precision View Control™ are proprietary technologies of Modou DSP. Any unauthorized reverse engineering, reproduction, or implementation of these technologies is strictly prohibited and may result in legal action.
Theory Chapters
Chapter 1 — The Problem
50 Years of Equalization
For 50 years, EQ has asked the same question:
"Which frequencies do I boost or cut — and by how much?"
From analog to digital, graphic to parametric, and now dynamic EQ — precision grew, but the premise never changed.
We still define fixed frequency bands and fixed processing zones, then shape tone within them.
Fixed Frequency Processing
Yet no single instrument ever sounds the same from one moment to the next. A vocal, a piano, a guitar — energy and harmonic structure shift with every phrase, every touch. The tone we are trying to control never sits at one fixed coordinate. For 50 years we have worked hard to shape a moving target from a stationary frame.
The Limitations of Dynamic EQ
Dynamic EQ was an important step — EQ began to react. But reaction still happened inside a band defined in advance. The amount could change; the reference could not.
EQOMP's Question
EQOMP asks a different question.
If sound itself is always in motion, shouldn't the way we control tone move with it?
EQOMP is, at its core, a high-performance 10-band EQ. Use it exactly as you would any precision parametric. But it also contains something new: internally, it analyzes up to 2,048 frequency points (at a 4096-sample buffer) and uses your placed EQ bands not as fixed processing boxes, but as listening references — points from which it tracks moving energy and harmonic structure in the actual signal.
From an EQ that adjusts fixed frequencies — to an EQ that responds to changing tone.
The Next Chapter of Equalization. Beyond Static Frequencies.
A New Possibility for the Next 50 Years of EQ.
Chapter 2 — Threshold Curve
Threshold Is Not a Line
In conventional compressors and dynamic EQs, the threshold is a flat horizontal line per band. EQOMP replaces that model: the threshold follows the shape of your EQ band — bell, shelf, or filter — so tone and dynamics are defined in one place.
Threshold Is a Curve
EQOMP does not place one flat compressor threshold across the whole spectrum. Each active dynamic band contributes its own threshold point, filter shape, and width, so the detector response is built from the same graph you are already editing for tone.
The result is a blended threshold curve. Bell bands create focused centers, shelves extend the boundary across one side, and multiple dynamic bands merge into one continuous curve instead of isolated detector zones. Tone and dynamics stay connected in one view.
Graph as Dynamic Map
You are editing where compression reacts, how wide it reacts, and how several bands combine, all from the same graph-driven workflow:
The main graph is not only an EQ display — it is a live dynamic map. Static curve shape, threshold points, Q width, and filter type together define where gain reduction begins and how strongly it applies across frequency.
Intuitive Control
Graph edits, popup edits, and footer controls all target the same band model, so activating compression from different UI paths still follows the same threshold and first-band rules.
Chapter 3 — Continuous Spectral Dynamics
2048 Frequency Points
At a 4096-sample FFT buffer, EQOMP evaluates up to 2,048 frequency points across the spectrum. This resolution lets the engine read fine spectral movement instead of relying on a handful of fixed crossover bands.
Listening References
Your placed EQ bands are not static processing boxes. They act as listening references — anchor points from which the engine tracks how energy and harmonic structure move in the actual signal.
Harmonic Tracking
Because detection follows spectral shape rather than isolated band edges, related harmonics and partials are treated as part of one continuous field. Dynamics respond to tonal movement without chopping the spectrum into unrelated zones.
Continuous Frequency Fields
Multiple bands blend into one threshold field. The result is a continuous frequency field — no hard crossover splits, no fixed detector rectangles — where reduction weight follows the combined curve you draw on the graph.
Chapter 4 — Single Band Compression
Broadband Dynamic Control
Single Band mode lets one dynamic band govern program dynamics across the full range while remaining frequency-selective. Instead of rebuilding a multiband chain, you shape broadband control from the same threshold curve you use for tone.
Q = 0.001
When Band 1 Dynamic EQ is first enabled with Utility 1ST. COMP set to Single Band, Q is set to 0.001 — the widest practical setting. This unlocks full-spectrum detector influence while gain reduction still follows threshold crossings.
Spectral Intelligence
The algorithm does not blindly compress the entire signal. It applies reduction only where energy crosses the threshold curve — so one band can behave like a bus compressor with spectral awareness rather than a fixed crossover compressor.
Full-Range Dynamic Processing
Bus glue, gentle mastering control, and transparent program leveling become possible from a single band. See the User Manual section Single Band Mode for 1ST. COMP settings, band rules, and workflow.
Chapter 5 — Harmonic Preservation
Why No Crossovers?
EQOMP does not need multiband crossover splits to define dynamic regions. The threshold curve is evaluated across the spectrum, so the audio path stays continuous and phase-coherent.
Continuous Spectral Processing
Processing weight is distributed across a blended threshold field instead of isolated band compartments. Neighboring bands merge smoothly, so broadband material, vocals, and buses keep a single coherent spectral identity under dynamics.
Natural Phase Behaviour
Because neighboring bands blend into one threshold field, transitions are smoother than hard per-band edges and feel more natural on broadband material, vocals, and buses.
Chapter 6 — AM Noise Control
Gain Modulation
Gain reduction is a time-varying control signal. If applied too quickly relative to the audio waveform, it modulates the signal itself and introduces audible artifacts. EQOMP treats gain application as a separate concern from detection speed.
Envelope Design
AM (Amplitude Modulation) noise occurs when the gain envelope changes faster than the audio waveform, causing phase distortion and harsh artifacts. EQOMP prevents this by keeping the gain envelope slow and smooth (sub-audio, below 10Hz), even with fast attack settings. Detection can be fast, but gain application must always be slow and musical.
Artifact Prevention
In summary: EQOMP calculates dynamics based on frequency, but always applies gain as a smooth, time-domain envelope. This prevents AM noise from rapid gain reduction while maintaining natural phase and harmonic relationships.
For practical workflow tips related to dynamics transparency, see Pro Tips in the User Manual.
Chapter 7 — Technical Comparison
Multiband Compressor vs Dynamic EQ vs EQOMP
Comparison with Traditional Tools
| Feature | Multiband Comp | Dynamic EQ | EQOMP |
|---|---|---|---|
| Frequency Selection | Fixed crossovers | Parametric bands | Parametric bands |
| Threshold Shape | Flat per band | Flat per band | Follows EQ curve |
| Phase Coherence | Crossover issues | Maintained | Maintained |
| Harmonic Treatment | Band-limited | Partial | Proportional |
| Processing Method | Split → Process → Sum | Gain modulation | Curve-weighted reduction |
| Transparency | Moderate | High | Very High |
| CPU Efficiency | Good | Good | Excellent |
In Short
You draw tone and dynamics on the same graph. Static EQ defines the shape, dynamic bands turn that shape into a live threshold curve, and Q or filter type defines how far the action spreads. The result can be surgical, broad, or smoothly blended across several bands.
Threshold Structures
Multiband compressors use flat thresholds per crossover band. Traditional dynamic EQ keeps flat thresholds inside parametric bands. EQOMP thresholds follow the EQ curve shape and blend across bands into one continuous field.
Frequency Resolution
Crossover-based tools are limited by band count and split topology. EQOMP evaluates up to 2,048 spectral points and uses band placement as listening references rather than fixed processing boxes.
Harmonic Behaviour
Multiband processing can band-limit harmonics. Conventional dynamic EQ improves on that but still treats each band as an isolated zone. EQOMP aims for proportional, curve-weighted reduction that preserves natural harmonic relationships.
Chapter 8 — The Future of Equalization
Beyond Static Frequencies
For decades, EQ has meant choosing fixed coordinates and shaping tone inside them. EQOMP shifts the frame: bands become references for tracking moving spectral energy.
Dynamic Spectral Control
EQOMP moves beyond static frequency frames toward dynamic spectral control — where bands act as listening references, threshold curves blend across the spectrum, and Single Band mode enables full-range compression with spectral intelligence.
The Next Chapter of Equalization
From an EQ that adjusts fixed frequencies — to an EQ that responds to changing tone.
The Next Chapter of Equalization. Beyond Static Frequencies.
A New Possibility for the Next 50 Years of EQ.